Chapter 2 Version Control with Git
Git is a version control system. It tracks all the changes you make to your files and allows you to go back to previous versions as far back in time as you need. Git is useful for a variety of reasons. Most of us are familiar with folders that look like this:
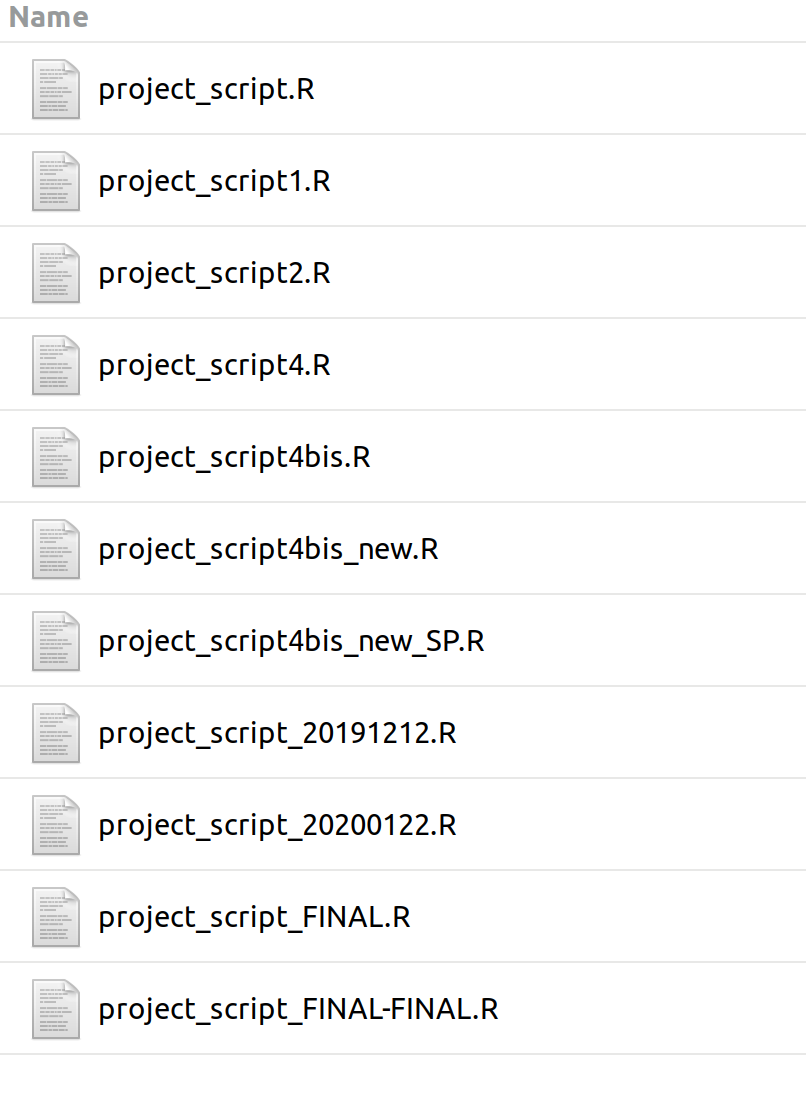
Saving multiple versions of files like this is problematic because, first, it uses space inefficiently (even if files are small, multiple versions add up and end up wasting a lot of room on our computers); second, and perhaps most importantly, it creates confusion and makes our workflow prone to errors. Instead of manually saving edits to a file in a separate copy “just in case”, and instead of having to keep track of which is the most recent version, we can put our files under version control and let Git keep track of the changes we make. Git will record a history of changes to each file without duplicating it, and we’ll be able to revert to any previous version in the history of that file. Version control allows us to be clean and tidy in our file organization, optimizing use of space without ever fearing to lose any of our work. Once a file is tracked by Git, it is virtually impossible to do anything irreversible to it.
I haven’t mentioned anything yet about the benefits of version control for collaborative work. This is because at its core, Git works locally on your computer. We often tend to think of version control as the way to handle multiple users working on the same file simultaneously, but Git is first and foremost a tool for your own file organization. Git is installed and runs on your machine, not on a network. It is the integration with an external server, be it private or public (GitHub and GitLab, for example, are public server providers), that makes Git a tool for multiple-user applications. This chapter focuses on the local functionalities of Git, while we’ll dive into its benefits for collaborative projects in the next Chapter.
2.1 Command line basics
You can use Git from the command line in the computer’s terminal. The command line can be intimidating if you haven’t used it before, but using Git only requires basic familiarity with it. Commands are slightly different between operating systems, so I’ll assume Windows is the most commonly used and specify the Mac/Linux alternative when applicable.
When you open up the terminal (or command prompt) on your computer, you’ll see a symbol, on many computers it is a “$” or “>”, followed by a blinking cursor. That symbol is called the prompt, and it means the terminal is waiting for your input. If you copy-paste any code from this chapter into your terminal, make sure you only copy the part after the prompt (don’t copy the >). Also, if Ctrl+V does not work in the terminal, you can right-click to paste.
When you open the terminal, you should automatically be located in the root directory of your file system (or your home directory, if you have a computer with multiple users). The name of the folder you’re in appears right before the prompt. For example, this is what my prompt looks like:
If you are not in your root directory when you first open up the terminal, you can use the following command to navigate to it:
This command stands for “change directory”. The “\” symbol indicates the root directory. On Mac/Linux, you can navigate to the root directory by simply typing “cd” or:
If you want to go to a specific directory other than the root, you can type its path (relative to the folder you’re currently in) after “cd”. To go from Users\Simona to Users\Simona\Documents:
If you want to go back to the parent of the current directory (the folder that contains it), you can use:
To go back to Users from Documents:
To go back to Documents from Users:
2.2 Configuring Git
Once Git is installed on our computer, we need to do a few one-time steps to configure it. Let’s set up our name and our email address by typing the following in the terminal:
> git config --global user.name "First Last"
> git config --global user.email "first.last@example.com"
This will be important when we start using GitHub. If you want to change these options in the future you always can, and if you want to use different options than the global ones within a specific project you can run the commands above removing “–global” while in the project directory (not the root!).
There are more configuration options you can personalize, but we won’t get into that in this chapter. If you want to check what configuration options you have active, you can use:
2.3 Getting help
If you need help while using Git, you can use any of the following commands to get the manual page for any of the Git verbs:
2.4 Creating a repository
Once Git is set up and configured, we are ready to create our first repository. A repository is a directory that is under version control. Let’s use the example directory structure from Figure 1.4. First, we navigate to the folder where we want to initialize our repository. In our example’s case, that is:
Now we will enable Git to start tracking everything inside this folder:
This command initializes Git. It may appear like nothing changed, but if you allow the option to show hidden files in your file explorer you will notice there is a new subfolder called .git. That folder is where Git will store all of its version control information. You don’t have to worry about the content of that folder and you can keep using your files normally like you always would.
2.5 Tracking files
Creating a repository enables Git to start tracking files within it, but that does not happen automatically. We have to tell Git which files we want to track. We can check what Git is tracking so far by using:
At the bottom, we’ll see a list of untracked files. We need to switch on tracking on those. To begin tracking a new file, we use the verb ‘add’. For example, to track a file named “green_frog_diet_data_cleaning.R” we would type:
This works well if we want to add a specific file. If we want to start tracking the whole content of the folder, we can do:
But be careful when using this command: Git is optimized to work with plain text files (for example .txt or R scripts), and it doesn’t really understand binary files (which is how Word files are stored, for example). Also, some files typically do not need to be version controlled, such as images; in fact, because they are large files, version controlling images can end up clogging your workflow. Make sure you are always aware of what exactly you’re adding when you use ‘git add –all’. When in doubt, add files one by one. There are also ways to make this process a little more distraction-proof: in the next step, we’ll see how to make sure we only track the files we want.
2.6 Ignoring files
We can set up some rules to exclude from version control files that it would be superfluous or detrimental to track. Writing these down as rules can save us some time and headaches versus having to decide manually every time. We can exclude files from version control within a repository by using .gitignore. This is simply a text file that lists all the rules for files that, by default, we do not want to track. Rules can be based on the file type or patterns in the file name. Generally, there are a few criteria you can consider when deciding what to exclude from version control:
- File encoding (plain-text vs. binary): Git cannot track changes within binary files, so, even though you can store these files under version control, you won’t be able to use Git to compare different version, so there’s really no point in tracking these;
- Code-generated: anything that can be reproduced by running code does not need to be version-controlled;
- Size: files that are too big will slow down the functioning of Git. As a benchmark, you can keep in mind the maximum size limit enforced by GitHub, which is 100 MB – but if you follow the two criteria above, you will rarely end up with this problem because 100 MB’s worth of plain-text files is a whole lot of plain text.
You can create a text file called “.gitignore” in our repository by using your default text editor (Notepad for Windows, TextEdit for MacOS, etc). The name must be exactly “.gitignore” for Git to recognize it. The file must have no extension (i.e., .txt) so go ahead and delete that (don’t worry about any warnings).
Once .gitignore is created, we can start adding rules. Nothing prevents us from listing files in .gitignore one by one, but this approach is not efficient:
stacked_barplot_diet_composition.jpg
predicted_population_trends.jpg
individual_movement_tracks.jpg
capture_locations.jpg
green_frog_diet_manuscript.docx
green_frog_movement_manuscript.docx
green_frog_demography_manuscript.docx
Instead, we can use pattern matching to kill many birds with one stone. What all these files have in common is they are all either .jpg’s or .docx’s. We can use the wildcard ’*’ to signify “any character” before the file extension:
*.jpg
*.docx
This will exclude any .jpg or .docx file from being tracked by Git in this repository. Since the images are conveniently located all together in one folder, we can also just do this:
figures/
We should also add the following rules to ignore the user-specific R project files:
*.Rhistory
/.Rproj.user/
We can add as many rules as we like, then save the .gitignore text file when we’re done. Now, if we didn’t forget to include anything that needed to be ignored, we can safely add all our files in one go:
2.7 The 3 states
Once files are tracked by Git, they can be in one of three states: modified, staged, or committed. A modified file includes edits that have not been recorded in Git yet; when we stage a modified file, we mark it as ready to be committed; when we commit that staged file, the current version gets stored in the history of that file.
Git works with snapshots called “commits”, which are records of what the repository looked like at a certain point in time. By committing a file, we freeze that version of the file forever in its history and we will be able to go back to it. Then, if we edit the file again, we’ll have to tell Git when we’re ready to make a new commit by moving that file to the staging area. Note that the same command ‘git add’ is used both to start tracking a previously untracked file and to add a modified file to the staging area.
Now we are ready to do our first commit. We use the following command:
Each commit should be accompanied by a message, added with the flag -m. The message should describe the changes made to the file/s since the previous commit. It is a good habit to write detailed commit messages, so that when we need to go back and recover a previous version of a file, we can read the history of commits and easily find the version we are looking for.
2.8 Un-staging files
It happens to the best of us. We forgot to add a certain rule to .gitignore and when we go ahead and get ready to commit our files we realized we just staged a file we didn’t want to stage. No worries, there is a way to fix that. The following command un-stages files and saves us from having to commit them:
You can use pattern matching here as well, but you’ll need to put a backslash in front of the wildcard:
2.9 Recovering a previous version of a file
Git works like a time machine, allowing us to recover any previous version of a tracked file. It does so by saving snapshots of what the file looked like at each commit. So, each commit represent a point in time that we can access to retrieve the version that existed at that time. We can take a look at the commit history using:
Here’s where current me will be grateful to past me for writing descriptive commit messages. If the commit messages do a good job of describing what changes I made to a file, it will be easy to recognize which commit is the one I want to go back to.
The string of numbers and letters following the word ‘commit’ in the log is called the hash and it uniquely identifies each commit. We can revert to the version of a file from a specific commit by using the hash as follows:
2.10 Removing Git
If for any reason you ever want to remove Git tracking from a repository (going back to a regular folder without version control) you can use the following command:
2.11 Git everyday
This chapter walked you through commands to configure git, initialize repositories, stage and un-stage files, commit changes, and revert to previous versions of a file. In practice, you may use some of these commands only once (e.g., to configure your email address when you first install Git) or when you start a new repository. In your everyday use of Git, the most important commands you need to remember are those to add and commit your changes. For everything else, feel free to refer back to this manual or other resources on the internet.
2.12 References
- The Carpentries lesson on Version Control with Git: http://swcarpentry.github.io/git-novice/
- Pro Git book by Scott Chacon and Ben Straub: https://git-scm.com/book/en/v2